Anyone pls tell me what is the minimum dashboard requirement to play this Damn game i figured how to run it and now i am stuck with "download game again" error pls reply :\
[h=3]How To Update JTAG/RGH To The Latest Dashboard (16203)[/h] Tags
dashlaunch,
Freestyle 3,
FSD,
how to update jtag/rgh to the latest dashboard,
jrunner,
jtag,
rgh,
simple 360 nand flasher,
tutorials,
video games,
XBOX 360
I had to update my system so I could play gta 5. Now this is a pretty lengthy and detailed tutorial designed for n00bs like me. So if this is your first time to update your XBOX 360 Dashboard/Kernel then I hope this will point you in the right direction.Take comfort in the fact that I succeeded in updating my dashboard on my first try using the following steps.
[h=4]MY SETUP[/h] + XBOX 360 4GB Arcade JTAG/RGH (I was led to believe my console was JTAG but I've also seen signs that it could actually be RGH).
+ Dashboard version was 14719 (to be updated to the latest version).
+
Freestyle Dash 3 running from 1 TB external hard drive
FAT32-formatted.
DISCLAIMER: If your setup is not exactly or at least very similar to mine, I cannot answer for any errors or damage your console may incur.
[h=4]REQUIRED XBOX 360 INFORMATION[/h] + CPU Key (read on to find out how to find your CPU key)
+ Motherboard version (mine is Trinity - read below to find out your motherboard version)
[h=4]APPS/UTILITIES REQUIRED[/h] +
Simple 360 NAND Flasher - For dumping and updating your dashboard.
+
JRunner - For creating a new dashboard update. Extract all files to any location on your PC.
+ Latest XBOX 360 Kernel supported (16203 at the time of writing) Download latest Dash Pack from the
JRunner link above. Extract the files into the JRunner folder you used above and overwrite any files if it asks you to.
[h=4]OTHER REQUIREMENTS[/h] + FAT32 formatted USB drive
[h=2]STEP ONE: Finding Your CPU Key[/h] - Turn on your XBOX 360 console not by pushing the power button but
by pressing the disc eject button. Your console should, after a few seconds, boot into XELL instead of the XBOX dashboard.
- Wait a bit longer and you should see the screen below.
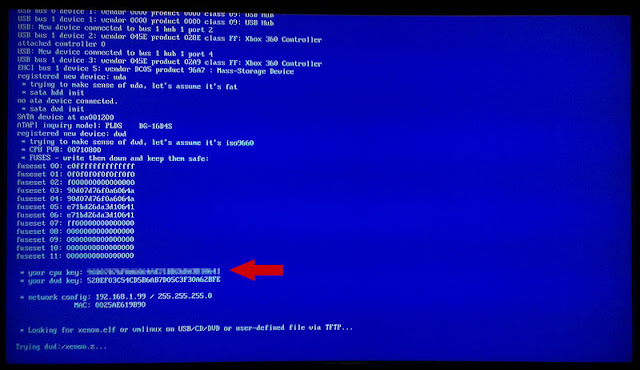
- Your CPU Key is indicated near the bottom. Take note of this by writing it down or taking a
photo.
[h=2]STEP TWO: Finding Your Motherboard Version.[/h] - Make sure your XBOX 360 console is powered off.
- Take a look at the back of it and find the sticker as indicated in the photo below. You should see a date in the YYYY/DD/MM format. That is your console's manufacture date. With that info, refer to the link below to find out which motherboard your console is toting.
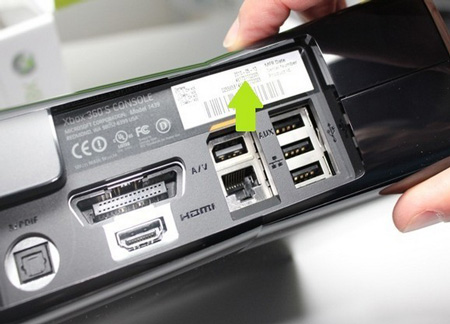
find your motherboard version here
https://en.wikipedia.org/wiki/Xbox_360_hardware#Motherboards
[h=2]STEP THREE: Dumping Your NAND (that sounds nasty)[/h] - Unpack or copy the Simple 360 NAND Flasher folder, which you downloaded, to the root of your external USB drive.
- Boot your console into Freestyle 3.
- Use the File Manager utility in FS3 to browse to the Simple 360 NAND Flasher directory, highlight default.xex, then press A to start the program.

- Press X as it says and the utility will quickly dump or copy your NAND to your USB drive. Mine only took 16 seconds.
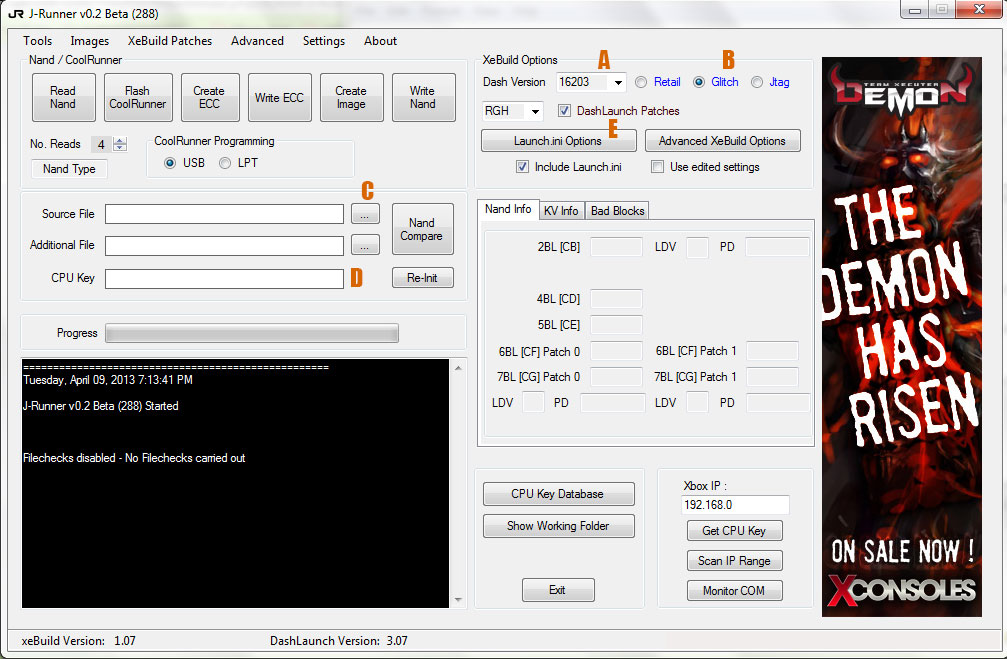
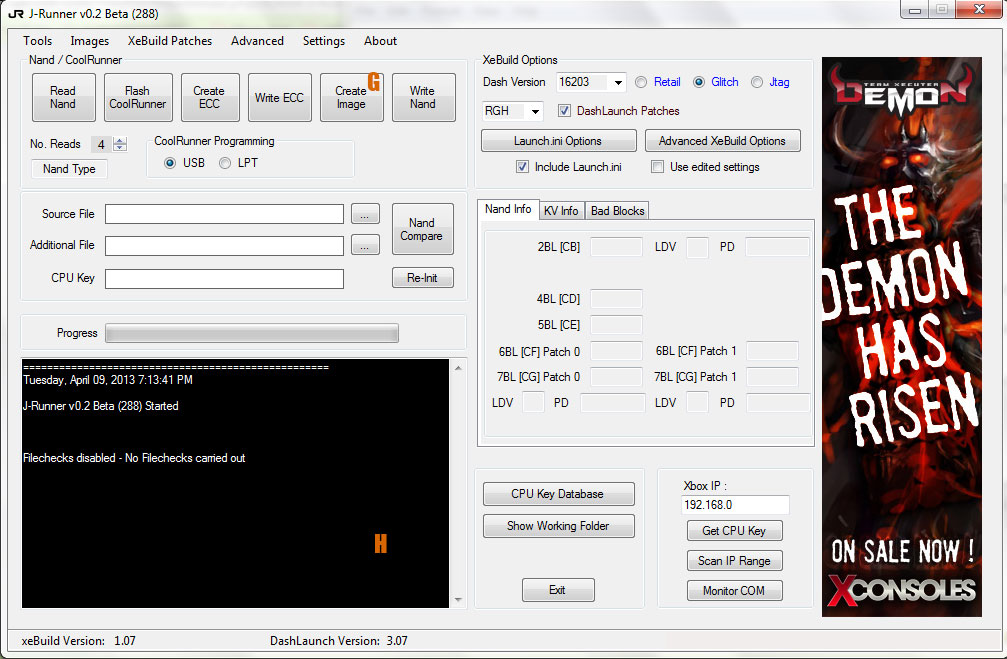
[h=2]STEP FOUR: Creating A New NAND Image[/h] - Fire up JRunner.
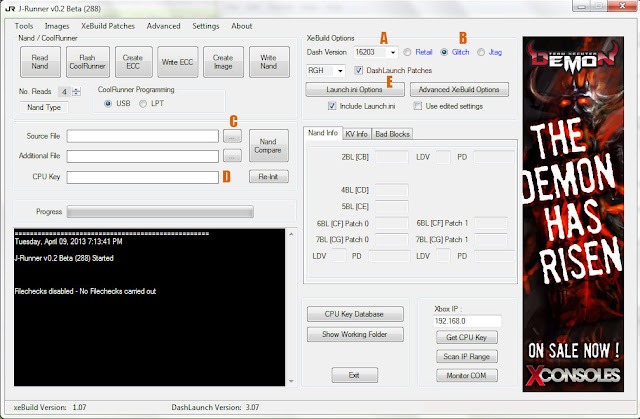
- [
A] Choose the dashboard version you wish to update to where it says Dash Version. This drop-down list is dependent on the Dash Packs you downloaded from the
JRunner page.
- [
B] Select RGH or JTAG depending on your console.
- [
C] Browse for the NAND that Simple 360 NAND Flasher dumped into your USB drive (your drive should be plugged into your PC duh!) It will be called
flashdump.bin and located in the Simple 360 NAND Flasher folder.
- [
D] Now type in your CPU key in the field provided.
- [
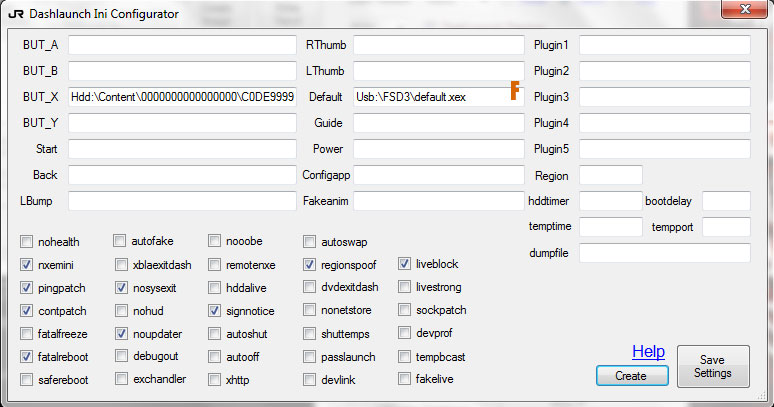
E] Select DashLaunch Patches and select Include Launch.ini [
E] ,then Launch.ini Options [
E]
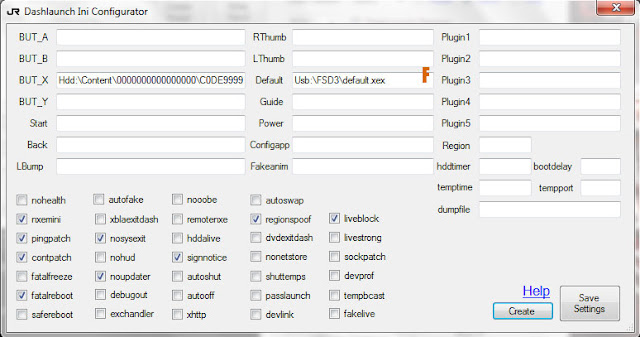
- You can configure your launch.ini here. Mousing over each item tells you what it does. If you still don't know how these work then just leave the defaults alone.
- [
F] Make sure the
default points to where Freestyle Dash is located in your system (mine is in a folder called FSD3 on my external HD.
- Close this window when done.
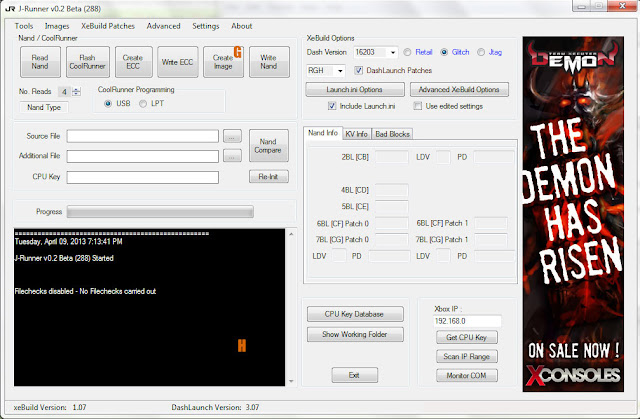
- [
G] Go ahead and click on the Create Image button near the top of the main JRunner window.
- [
H] JRunner will create your new NAND and the log window will show you where the new NAND has been saved.
- Navigate to that location and copy the file called
updflash.bin to the
ROOT of your USB drive.
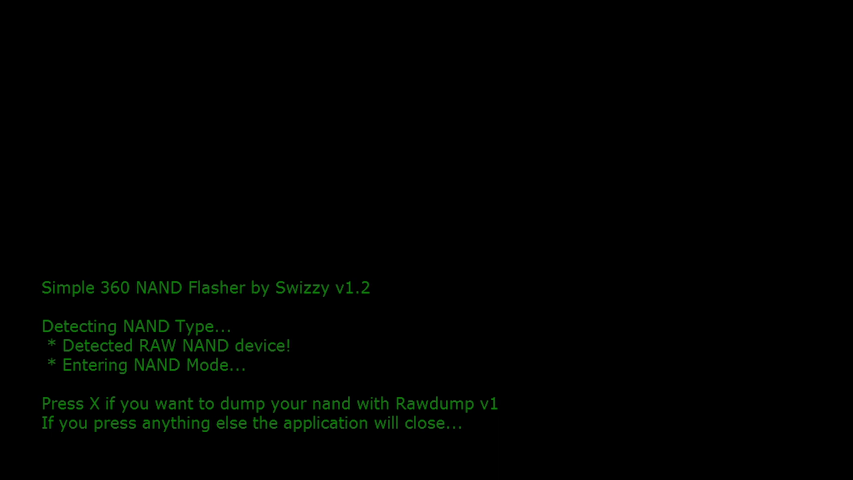
[h=2]STEP FIVE: Updating Your NAND[/h] - Go back to your XBOX console and like in step three, open up Simple 360NAND Flasher.
- You will be greeted by slightly different screen this time.
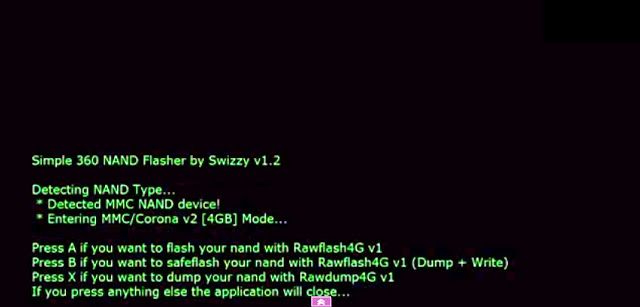
- Press A to overwrite your NAND with the one we created in step four. This should only take about 30 seconds.
- The console will then power off (no it's still working, don't worry).
- Boot up your console again and your XBOX 360 Dashboard will now be updated to the latest supported version.


 Want To Sell Zflip 5 boxed 10/10 non pta like new
 Want To Sell Arctic P12 PWM Premium Fans Brand New (6 available)
 Aciel:
Online session is enabled for UBL. I have an active subscription with my NayaPay card (it is already added to Google Payment Methods).
Aciel:
Online session is enabled for UBL. I have an active subscription with my NayaPay card (it is already added to Google Payment Methods).
 Necrokiller:
The only valid thing from his pov he said in the video is AC dead since Black Flag. According to woke police that game was woke too. Welsh man in West Indies. So atleast he's consistent I guess lol
Necrokiller:
The only valid thing from his pov he said in the video is AC dead since Black Flag. According to woke police that game was woke too. Welsh man in West Indies. So atleast he's consistent I guess lol XPremiuM:
Meanwhile Ghost of Tsushima PC version is out now. Looks 100 times better than ASS Creed already.
XPremiuM:
Meanwhile Ghost of Tsushima PC version is out now. Looks 100 times better than ASS Creed already.

