FAN MOD
(though i was looking for modding simple black fans but i found this one which is also usefull from putting leds in any fan)
But first! What you do is your own responsibility. If you decapitate a pigeon with the soldering iron - it's your fault - not OCAU's or my own. What's written here is a general guide - not a detailed technical reference.
So lets get down to it.
What you'll need:
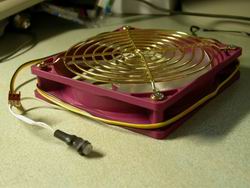
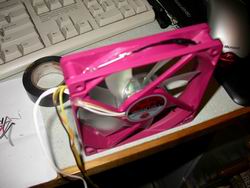
Lets start with the obvious. We have this:
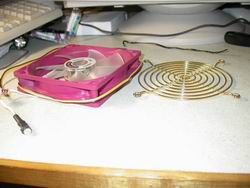
 The fan grill is just going to get in the way, so with your trusty philips-head screwdriver, remove the grill to turn it into this:
 We'll start by selecting where we want to put the LEDs. Plan it so that the head of one LED points at the head of the next - this makes sure that the light distribution is realtively even, and that the light of one doesn't overpower the light from the next.
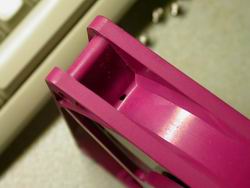
Also mark the spot for a hole on the solid corners where the screw goes. This is where a wire will be fed through to make it appear neater.
The mark for where the LED hole will go.If you're not confident with your drilling then I recommended that you remove the fan blades. To do this, take off the sticker on the side which says "Compuman", remove the circlip and pull the fan out of the shroud. This'll make sure that when you drill through the shroud and go too far that you don't scratch the blades of the fan with the end of the drill bit. If you need a better explanation about circlip removal, check out CaseJunkiez's fan painting article.
Drilling the holes
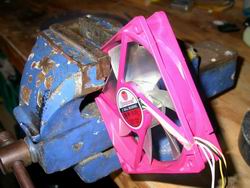
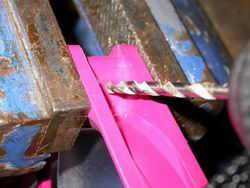
Start the holes off by turning the drill bit where centre of the markings are. This will make sure that the drill bit doesn't ride off anywhere when you actually use the drill. With your drill bit which is slightly larger than the base of the LED itself, lock the fan into a vice and commence the drilling of all marked LED positions.
The fan sitting in the vice ready for drilling.If you haven't removed the fan blades then keep an eye out as you're drilling. Watch the other side of the fan, taking it slowly as you drill watching for any discolouration - the discolouration indicates that the drill bit is about to come through, and that you should back off.
Now also drill the corner holes where the wire will be passed through. A smaller drill bit can be used here (unlike the one in the photo) - a drill bit slightly larger than the wire itself will be sufficient.
The wire holes being drilled out.You'll get something like:
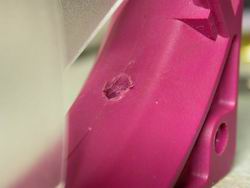
The LED hole drilled.The next part is cleaning up. Grab drill bits just a bit larger than the holes themselves and turn them by hand to clean up any debris:
Using a drill bit to clean out any plastic debris on the other side of the hole.Once the drilling has been cleaned up, reattach the fan blades if you had removed them.
Soldering and LED placement
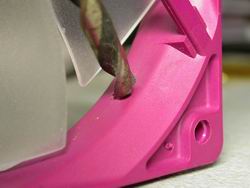
Now place the LED in the hole and align it so that one leg pokes through the wire hole and the other goes in the opposite direction around the fan. Apply just a drop of super glue to keep it in place, keeping the drop small - only a tiny bit is required to stop it from moving and the goal is just to stop it moving, not lock it in that position for life (just in case you kill a LED, break off a leg, etc). Repeat for all 4 LEDs, having it so that the positive leg from one LED points to the negative leg on the next. Make sure that you leave some clearance between the head of the LED and the fan blades - give them a spin to make sure you haven't obstructed the fan's movement.
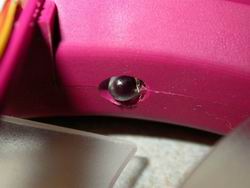
A (messy) hole with the LED sitting in it.Next, cut off 2 lengths of shrinkwrap for each of the 3 lengths of wire which have had their ends tinned. Cut the wire to size to fit to join the LEDs, and then tin the ends. Join up the negative poles to the positive poles with the wire - remembering to have the shrinkwrap already on the wire ready (but not actually shrunk). Once soldered, shift the shrinkwrap into position and give it a blast of hot air. You'll have something similar, but a lot neater than this:
One of the sides before shrinkwrapping/insulating. Yours should look similar, except that the LED leg shouldn't be as long.With 3 sides done, we need to hook up some power. This is where the trusty molex splitter comes in handy:
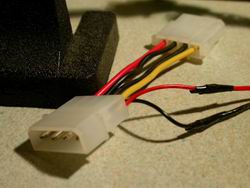
The molex splitter.Grab the molex connector, and if you're using a switch solder it up to the positive wire. Shrinkwrap/insulate as necessary.
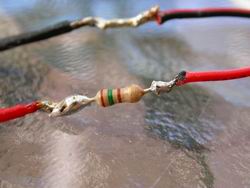
Still on the positive side, solder on your resistor (having slid on some shrinkwrap beforehand). Now with some longer wire, solder the red stuff to the resistor. Attach enough black to the negative side to bring it in length with the positive wire + resistor + optional switch.
A resistor.Now hook up the positive side to the remaining positive LED leg, and the negative side to the remaining negative LED leg. Superglue some of the wire down so that any pulling on the wire doesn't directly pull on the LEDs - ripping off legs is not fun at all. Hopefully you'll get something like this:
Everything hooked up.Lights, Camera...
Make sure everything is insulated. If there is some exposed wiring make sure that you cover it up, as the last thing you want is electricity going places it shouldn't be.
Then hook up the molex connector, and power it on. Hopefully by now you have something resembling:
Test-lighting the fan. Some colours have appeared more dominant than others in this photo.Give the fan that last spin by hand to ensure that the blades aren't going to smack into the LEDs, and also check that the LEDs aren't moving. If they are apply a drop (just a drop) of superglue to stop them.
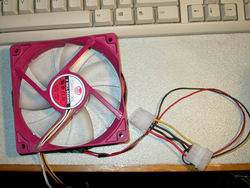
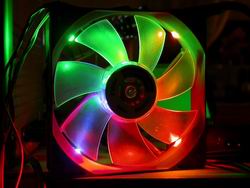
Now, apply some power to the actual fan itself:
 Huzzah!And you're done. Put the fan grill back on, stick it in your case and enjoy.
For more pictures, check out my PCDB entry. Also, consider reading OCAU's other DIY LED Fan Mod article, for a different perspective. If case modding is your thing, check out the PC Database!
SOURCE: DIY FAN MOD
FEW MORE PICS


(My apologises for the confusing pic.)
I hope its clear, if not, here's a scheme:

The result:


(though i was looking for modding simple black fans but i found this one which is also usefull from putting leds in any fan)
But first! What you do is your own responsibility. If you decapitate a pigeon with the soldering iron - it's your fault - not OCAU's or my own. What's written here is a general guide - not a detailed technical reference.
So lets get down to it.
What you'll need:
- 1 x Enermax speed-adjustable fan.
- 4 x high intensity LEDs.
- Superglue.
- 1 x molex connector. I used the pass-through type which has a female connector too.
- Thin gauge wire - red and black preferred.
- 1 x resistor (rating determined later)
- Heatshrink.
- a 2 position switch.
- A black marker.
- Helping hands - handy like cannon.
- A drill. The size of the drill bit used will need to be slightly larger than that of the head of the LED.
- A hairdryer or anything else which can blow warm air. (a lawyer?)
- A soldering iron.
Lets start with the obvious. We have this:


Also mark the spot for a hole on the solid corners where the screw goes. This is where a wire will be fed through to make it appear neater.

The mark for where the LED hole will go.
Drilling the holes
Start the holes off by turning the drill bit where centre of the markings are. This will make sure that the drill bit doesn't ride off anywhere when you actually use the drill. With your drill bit which is slightly larger than the base of the LED itself, lock the fan into a vice and commence the drilling of all marked LED positions.

The fan sitting in the vice ready for drilling.
Now also drill the corner holes where the wire will be passed through. A smaller drill bit can be used here (unlike the one in the photo) - a drill bit slightly larger than the wire itself will be sufficient.

The wire holes being drilled out.

The LED hole drilled.

Using a drill bit to clean out any plastic debris on the other side of the hole.
Soldering and LED placement
Now place the LED in the hole and align it so that one leg pokes through the wire hole and the other goes in the opposite direction around the fan. Apply just a drop of super glue to keep it in place, keeping the drop small - only a tiny bit is required to stop it from moving and the goal is just to stop it moving, not lock it in that position for life (just in case you kill a LED, break off a leg, etc). Repeat for all 4 LEDs, having it so that the positive leg from one LED points to the negative leg on the next. Make sure that you leave some clearance between the head of the LED and the fan blades - give them a spin to make sure you haven't obstructed the fan's movement.

A (messy) hole with the LED sitting in it.

One of the sides before shrinkwrapping/insulating. Yours should look similar, except that the LED leg shouldn't be as long.

The molex splitter.
Still on the positive side, solder on your resistor (having slid on some shrinkwrap beforehand). Now with some longer wire, solder the red stuff to the resistor. Attach enough black to the negative side to bring it in length with the positive wire + resistor + optional switch.

A resistor.

Everything hooked up.
Make sure everything is insulated. If there is some exposed wiring make sure that you cover it up, as the last thing you want is electricity going places it shouldn't be.
Then hook up the molex connector, and power it on. Hopefully by now you have something resembling:

Test-lighting the fan. Some colours have appeared more dominant than others in this photo.
Now, apply some power to the actual fan itself:

 Huzzah!
For more pictures, check out my PCDB entry. Also, consider reading OCAU's other DIY LED Fan Mod article, for a different perspective. If case modding is your thing, check out the PC Database!
SOURCE: DIY FAN MOD
FEW MORE PICS
Spoiler: show
(My apologises for the confusing pic.)
I hope its clear, if not, here's a scheme:
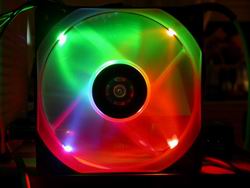
The result:
Last edited by a moderator:
")